We promise no intrusive ads, Please help keep the community alive
Consider supporting us by disabling your ad blocker / add to whitelist / purchasing VIP.
Consider supporting us by disabling your ad blocker / add to whitelist / purchasing VIP.
Search the Community
Showing results for tags 'graphics'.
Found 19 results
-

Version 2.0.3
3,307 downloads
What is new? -Added HDR Support -Modified Road Textures -Modified Vegetation -Rearranged Weather Times of day: -Morning -Midday -Afternoon -Evening Installation: Copy the files from FX folder to Euro/Bnk/FX; Copy the .bnk files to Euro/Bnk/Level/Hawai; Backup your files before replacing them. BONUS TWEAKS: Copy/Edit the lines you want (fx.ini) GRASSENABLED = FALSE (disables the grass and increases FPS) SUNENABLED = FALSE (disables the sun) SPAWNDISTANCES = 1 (disables traffic and increases FPS)Free -
Version 1
1,838 downloads
This is a simple Reshade preset with non-RTX & non-DX12 RT ray tracing effect* that I tried to make it work with TDU2. Press shift + F12 to open the panel and adjust the graphics settings in-game. Setup Just move the files to where the actual game executable file is. If you can't play TDU2 because you have an nVidia RTX graphics card then do the steps below!** Delete D3D9.DLL, if it is in the TDU2 directory Get DirectX9 https://www.microsoft.com/en-us/download/confirmation.aspx?id=8109 Run directx_Jun2010_redist.exe. Extract the files wherever on your PC Out of the extracted files, find and run the DXSETUP.exe and finish installing the DX9. Install this ReShade mod and enjoy! Recommended to check the ReShade git for latest updates and guides ______________________________ * ReShade is a freeware for modifying shaders more about this tool is available here ** This guide is taken from "Mulano_iZz_LuEp" from here THIS SOFTWARE IS PROVIDED BY THE COPYRIGHT HOLDERS AND CONTRIBUTORS "AS IS" AND ANY EXPRESS OR IMPLIED WARRANTIES, INCLUDING, BUT NOT LIMITED TO, THE IMPLIED WARRANTIES OF MERCHANTABILITY AND FITNESS FOR A PARTICULAR PURPOSE ARE DISCLAIMED. IN NO EVENT SHALL THE COPYRIGHT HOLDER OR CONTRIBUTORS BE LIABLE FOR ANY DIRECT, INDIRECT, INCIDENTAL, SPECIAL, EXEMPLARY, OR CONSEQUENTIAL DAMAGES (INCLUDING, BUT NOT LIMITED TO, PROCUREMENT OF SUBSTITUTE GOODS OR SERVICES; LOSS OF USE, DATA, OR PROFITS; OR BUSINESS INTERRUPTION) HOWEVER CAUSED AND ON ANY THEORY OF LIABILITY, WHETHER IN CONTRACT, STRICT LIABILITY, OR TORT (INCLUDING NEGLIGENCE OR OTHERWISE) ARISING IN ANY WAY OUT OF THE USE OF THIS SOFTWARE, EVEN IF ADVISED OF THE POSSIBILITY OF SUCH DAMAGE.Free- 3 reviews
-
- 4
-

-
- reshade
- graphic mod
- (and 9 more)
-
View File TDU2 Graphics Improvement Mod (Reshade) Make your game more vivid! -Changes: Increased sharpness Bloom Better colors FXAA (Antialiasing) How to install: Copy and paste the files from the zip on your TDU2 Folder And if necessary, load the reshadepreset.ini from reshade settings (press the Home button) Submitter stoplookingmypic Submitted 01/26/2023 Category Environment
-
Version 220323.1432
1,712 downloads
Ретекстур для игры Test Drive Unlimited Качество текстур мира игры улучшено в 6-8 раз по сравнению с оригиналом. Все текстуры и дизайн делались с нуля. После установки мода, возможен выбор между - HiRes версией и LowRes. Ориентируйтесь на производительность вашего оборудования! Посмотреть скриншоты обоих версий можно тут - https://drive.google.com/drive/folders/1wF38OQ4Pm_KB0eN6-Ud972tN0i3LXKIE Установка - читайте в ридми в папке на Гугл-диске, рядом с архивом мода! ОБЯЗАТЕЛЬНО! Обзорное Видео в 4К: Translation: Retexture for the game Test Drive Unlimited The texture quality of the game world has been improved by 6-8 times compared to the original. All textures and design were made from scratch. After installing the mod, you can choose between - HiRes version and LowRes. Focus on the performance of your equipment! You can see screenshots of both versions here - https://drive.google.com/drive/folders/1wF38OQ4Pm_KB0eN6-Ud972tN0i3LXKIE Installation - read the readme in the folder on Google Drive, next to the mod archive! NECESSARILY! Google translator (с)Free -
View File TDU1 - New Hawaii - ULTRA HD 4K Retexture (Gift from "Test Drive Unlimited 2 RS Project") Ретекстур для игры Test Drive Unlimited Качество текстур мира игры улучшено в 6-8 раз по сравнению с оригиналом. Все текстуры и дизайн делались с нуля. После установки мода, возможен выбор между - HiRes версией и LowRes. Ориентируйтесь на производительность вашего оборудования! Посмотреть скриншоты обоих версий можно тут - https://drive.google.com/drive/folders/1wF38OQ4Pm_KB0eN6-Ud972tN0i3LXKIE Установка - читайте в ридми в папке на Гугл-диске, рядом с архивом мода! ОБЯЗАТЕЛЬНО! Обзорное Видео в 4К: Translation: Retexture for the game Test Drive Unlimited The texture quality of the game world has been improved by 6-8 times compared to the original. All textures and design were made from scratch. After installing the mod, you can choose between - HiRes version and LowRes. Focus on the performance of your equipment! You can see screenshots of both versions here - https://drive.google.com/drive/folders/1wF38OQ4Pm_KB0eN6-Ud972tN0i3LXKIE Installation - read the readme in the folder on Google Drive, next to the mod archive! NECESSARILY! Google translator (с) Submitter Adm-RAL Submitted 03/24/2022 Category Environment
-
Version 1.1.0
1,257 downloads
Make your game more vivid! -Changes: Increased sharpness Bloom Better colors FXAA (Antialiasing) How to install: Copy and paste the files from the zip on your TDU2 Folder And if necessary, load the reshadepreset.ini from reshade settings (press the Home button)Free -
View File [TDU 1] HD Realistic Graphics Mod + Textures (Low PC Compatible) What is new? -Added HDR Support -Modified Road Textures -Modified Vegetation -Rearranged Weather Times of day: -Morning -Midday -Afternoon -Evening Installation: Copy the files from FX folder to Euro/Bnk/FX; Copy the .bnk files to Euro/Bnk/Level/Hawai; Backup your files before replacing them. BONUS TWEAKS: Copy/Edit the lines you want (fx.ini) GRASSENABLED = FALSE (disables the grass and increases FPS) SUNENABLED = FALSE (disables the sun) SPAWNDISTANCES = 1 (disables traffic and increases FPS) Submitter stoplookingmypic Submitted 11/15/2021 Category Environment
-
Version 1.0.0
586 downloads
A set of five nVidia Profile Inspector profiles for use with Test Drive Unlimited 2 to improve the visuals of the game. Profiles are provided in five different flavours according to performance impact, so experiment with each of them and find the best trade-off between image quality and performance. Requirements: A Windows PC with an nVidia graphics card (GPU) nVidia Profile Inspector installed in a folder of your choice. (Click the link for the download page). How to Use: Download and extract the zip to a folder on your computer. Start the game and turn Anti-Aliasing Off in Video Options as shown in the Settings pic. You may set the other video quality options to your preference. Quit the game and launch nVidia Profile Inspector. Select Test Drive Unlimited 2 from the Profiles drop-down. Click the Import user defined profiles button on the toolbar. Browse to and select the desired .nip file from the folder where you saved them earlier. Wait a few seconds for nVidia Profile Inspector to load the profile. Click the Apply changes button. Launch the game and inspect the results. Technologies implemented: Multisampling Anti-Aliasing (MSAA) - smoothes jagged edges of 3D objects. Sparse Grid Transparency SuperSampling Anti-Aliasing (SGSSAA) - smoothes jagged edges of 3D objects. Anisotropic Filtering (AF) - improves textures that are viewed from acute angles. Very low performance cost. Horizon Based Ambient Occlusion (HBAO) - more realistic shadows where 3D objects join. Scalable Link Interface (SLI) - support for multiple linked graphics cards in the same PC. Profile contents: Potato: 4x MSAA, 2x SGSSAA, 16x AF, HBAO Off Light: 4x MSAA, 2x SGSSAA, 16x AF, Performance HBAO Medium: 4x MSAA, 2x SGSSAA, 16x AF, Quality HBAO Heavy: 8x MSAA, 4x SGSSAA, 16x AF, Quality HBAO Extreme: 8x MSAA, 8x SGSSAA, 16x AF, High Quality HBAO Customisation: Feel free to tweak your profile if you wish! I recommend sticking to the following settings, since most of the the other altered settings throughout the profile are required for compatibility with TDU2. Antialiasing - Setting Antialiasing - Transparency SuperSampling Anisotropic Filtering Setting Ambient Occlusion setting Other settings that may be useful in your system: Frame Rate Limiter V3 - limits in-game FPS to a maximum value you specify. Very high frame rates can produce glitches in TDU2. Triple Buffering - can improve FPS (over double-buffering + Vsync) while reducing screen tearing. Do not use with Vsync. Vertical Sync - limits FPS to match the refresh rate of your monitor. Enabling this can eliminate screen tearing. When you are done tweaking, use the Export user defined profiles button to save your own custom .nip file for TDU2! Credits: Profiles based on Test_Drive_Unlimited_2_SGSSAA_HBAO_SLI_Profile.nip, originally developed by GuruKnight and others on Guru3D forums. Performance-based profile customisation, testing and packaging by GeeTee (Discord: @GeeTee#0394)Free -
View File TDU2 nVidia Inspector Profiles by GeeTee A set of five nVidia Profile Inspector profiles for use with Test Drive Unlimited 2 to improve the visuals of the game. Profiles are provided in five different flavours according to performance impact, so experiment with each of them and find the best trade-off between image quality and performance. Requirements: A Windows PC with an nVidia graphics card (GPU) nVidia Profile Inspector installed in a folder of your choice. (Click the link for the download page). How to Use: Download and extract the zip to a folder on your computer. Start the game and turn Anti-Aliasing Off in Video Options as shown in the Settings pic. You may set the other video quality options to your preference. Quit the game and launch nVidia Profile Inspector. Select Test Drive Unlimited 2 from the Profiles drop-down. Click the Import user defined profiles button on the toolbar. Browse to and select the desired .nip file from the folder where you saved them earlier. Wait a few seconds for nVidia Profile Inspector to load the profile. Click the Apply changes button. Launch the game and inspect the results. Technologies implemented: Multisampling Anti-Aliasing (MSAA) - smoothes jagged edges of 3D objects. Sparse Grid Transparency SuperSampling Anti-Aliasing (SGSSAA) - smoothes jagged edges of 3D objects. Anisotropic Filtering (AF) - improves textures that are viewed from acute angles. Very low performance cost. Horizon Based Ambient Occlusion (HBAO) - more realistic shadows where 3D objects join. Scalable Link Interface (SLI) - support for multiple linked graphics cards in the same PC. Profile contents: Potato: 4x MSAA, 2x SGSSAA, 16x AF, HBAO Off Light: 4x MSAA, 2x SGSSAA, 16x AF, Performance HBAO Medium: 4x MSAA, 2x SGSSAA, 16x AF, Quality HBAO Heavy: 8x MSAA, 4x SGSSAA, 16x AF, Quality HBAO Extreme: 8x MSAA, 8x SGSSAA, 16x AF, High Quality HBAO Customisation: Feel free to tweak your profile if you wish! I recommend sticking to the following settings, since most of the the other altered settings throughout the profile are required for compatibility with TDU2. Antialiasing - Setting Antialiasing - Transparency SuperSampling Anisotropic Filtering Setting Ambient Occlusion setting Other settings that may be useful in your system: Frame Rate Limiter V3 - limits in-game FPS to a maximum value you specify. Very high frame rates can produce glitches in TDU2. Triple Buffering - can improve FPS (over double-buffering + Vsync) while reducing screen tearing. Do not use with Vsync. Vertical Sync - limits FPS to match the refresh rate of your monitor. Enabling this can eliminate screen tearing. When you are done tweaking, use the Export user defined profiles button to save your own custom .nip file for TDU2! Credits: Profiles based on Test_Drive_Unlimited_2_SGSSAA_HBAO_SLI_Profile.nip, originally developed by GuruKnight and others on Guru3D forums. Performance-based profile customisation, testing and packaging by GeeTee (Discord: @GeeTee#0394) Submitter GeeTee Submitted 07/03/2021 Category Tools / Others
-
DΛN submitted a file in Tools View File
-
- 1
-
-
- visuals
- enhancement
- (and 9 more)
-
Yo hello. So i don't know if i'm late with the news but i've just seen ReShade release 3.0 the past few days and it's phenomenal for me. It's got the easiest interface i've experienced so far for third party post processing programs and even installing it is very simplistic. No more SweetFX+Reshade. It's just one smooth mod. [ATTACH]27323[/ATTACH] I have also just started playing TDU 1, but i've already played TDU 2 so. I know, not cool. [ATTACH]27324[/ATTACH][ATTACH]27327[/ATTACH] [ATTACH]27326[/ATTACH][ATTACH]27328[/ATTACH] Theses first few photos are me fiddling with ReShade + the timescale mod which makes everything orange. The rest are without the timescale mod. [ATTACH]27329[/ATTACH] Just look at that beaut!! [ATTACH]27330[/ATTACH] [ATTACH]27331[/ATTACH] It does its job very well and the FPS loss is not noticable on my system (a mid-spec build), except only for processes like cartoonify. My settings have around 5 or more processes enabled. So then, to the main point of this post, because it's not just a gallery. ReShade 3.0 uses d3d9.dll. Which also happens to be the second file of only two files of TDU Project Paradise. I tried looking around for a way to get the two work together, and one was using EnbInjector, keeping TDUPP's .dll as the main and writing ReShade's .dll as a proxy library on the injector's .ini file. Which didn't work. There was also another workaround, which involves using the dinput8.dll, which seems to be an API loader, and store ReShade's files in a /scripts named folder. Unfortunately the community patch also uses dinput8.dll. I wonder how i can make this work? Besides. My game was also messed up by all the patches and mods, i am going to have to study how to install them properly first. Some cars and parts weren't showing up, and the game crashed frequently.
-
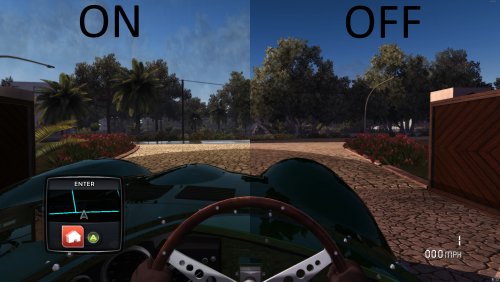
REVOLUTIONFX A graphics revolution for TDU2. REVOLUTIONFX is a graphics modification for Test Drive Unlimited 2. It makes TDU2 appear more modern and fresh. Features: Bloom EdgeAA (Antialiasing) LenzReflections (lens flare) reworked sky (sun, clouds etc.) reworked environment (colors, reflections etc.) reworked lighting (cars, house interior etc.) Pictures: Bugs: Please tell me if you find any bugs and I will try to fix them. Known bugs and fixed bugs will be listet here later. Installation: Extract the files from the archive into the game directory or where the game execution file is (.exe). Activation/Deactivation: After you installed the modification correctly, start the game. Press Shift + F12 to activate and deactivate the modification. Copyright: © 2007-2015 Vorontsov Boris ENB Preset by Wieditox DOWNLOAD WIEDITOXMODZ
-
http://forum.turboduck.net/threads/33413-revolutionfx
- 34 replies
-
- 5
-
-
- environment
- unlimited
- (and 5 more)
-
Hey guys. I´m BACK! I started modding again. And yes, an ENB for TDU2 is in the works! And yes, it will be great, just as my previous ones. More informations in some days/weeks. Check out my new website for screenshots, informations and other stuff. :nods: Website: http://wieditoxmodz.wix.com/wieditoxmodz Have a great day, Wieditox
-
Hi! What is the best mod graphics for TDU?
-
Right, lets learn some of the basics in PS. I use Photoshop CS3 Extended (the latest, biggest and best :D) in Windows Vista. Even so, most versions are similar, and you should be able to follow the tutorials okay if you use a different version or OS. Anyhows, enough of my rambling, lets get this show on the road... Before we get our way into images, lets get used to Photoshop. So open it up, and look at what you've got. http://i186.photobucket.com/albums/x12/randomus_robbius/th_psshot1.jpg 1: Menu Bar. This contains a lot of useful stuff, you'll use it a lot. Make sure you know I refer to it as the Menu Bar :P 2: Tool Options. This contains info and different options about the selected tool. 3: Toolbar. Contains all the different tools, we'll go into them a bit more in a sec. 4: Dock. This contains more useful stuff, which we'll go into in a sec. 5: The Navigator gives you a small overview of your image. The small slider underneath is the zoom. You can also change the zoom by typing it in the small box next to the slider. Once zoomed it, you can move around your imager by clicking in the red box and dragging it around your image. 6: Your Pallette. Yours will most likely be on the tab 'Color', I tend to keep mine on 'Swatches' as it has a load of preset colours. Simply click the colour you want, and it'll become your foreground colour. 7: This contains your Layer Pallette. Layers are immensely useful. They're like seperate images within your image. You can move, delete, edit, erase, and make new layers. I'll show you how to do most of this in a minute. Before you start... You'll need to know a couple of things. First of all - how to undo what you've done, either... Press 'Ctrl + Alt + Z' or go though your History (See #4) You'll also need to know about your colour palette. http://i186.photobucket.com/albums/x12/randomus_robbius/colours.jpg The top colour (Black be default) is your foreground colour. This will be used by most tools. The bottom colour (white be default) is your background colour. This is only used by a couple of tools. The small symbol on the top left reverts the colours back to default. The symbol on the top right switches the foreground and background colour around. Click on either the fore- or background colour and this will appear... Now we've gone over that, I'm gonna actually get on to the bits I kept promising you, lol 3: The Toolbar Move Tool http://i186.photobucket.com/albums/x12/randomus_robbius/movetool.jpg This is used to move the different layers around. Click and Drag: This is used to move the selected layer arould Hold 'Shift', Click and Drag: Moves the selected layers in a straight line, useful for alignment Right Click: Shows a list of layers under your cursor. Clicking on one selects that layer, making it possible to move it Marquee Tool http://i186.photobucket.com/albums/x12/randomus_robbius/marqueetool.jpg This is used to make selections. Selections allow you to move part of an image/layer around, apply effects to that area, fill that area with a colour or gradient, etc, etc. The different shapes allow you to select circles, rectangles and one pixel selections horizontal or vertically. Click and Drag: Makes a selection Hold 'Shift', Click and Drag: Makes a perfect circular or rectangluar selection Hold 'Ctrl': Changes to the move tool, allowing you to move the selected layer Once you've made a selection (a moving black and white line indicates your selection), you can either move the selection around, create a new one or change it. In the Menu Bar (the bit at the top, remember?) you will see it says 'select'. http://i186.photobucket.com/albums/x12/randomus_robbius/selectmenu.jpg All: This selects the whole of your image Deselect: Removes all selections Inverse: Switches your selection around. Selects the bits that weren't and deselects the bits that were. All Layers: Selects every layer, useful for applying effects to whole image, etc. Deselect Layers: Does what it says on the tin. Haven't the foggiest why that'd be useful, but hey :p Similar Layers: Selects every layer of that type (text or image, etc) Color Range: Allows you to choose areas of the same colour Refine Edge: Gives various options to give smoother, better looking edges Modify: Options to change your selection. Grow: Automatically expands the selection to more of the same colour Similar: Same as Grow, but selects similar colours from the rest of the image as well. Transform Selection: Brings up the Free Transform tools for your selection allowing you to adjust the selection as you wish. Load Selection: Allows you to choose a previously saved selection shape Save Selection: Saves the current selection shape Lasso Tool http://i186.photobucket.com/albums/x12/randomus_robbius/lassotool.jpg Also used to make selections, but not of preset shapes. You have 3 different tools; Lasso Tool: Freehand selection tool, click and move around the area you want to select. (Not the easiest tool to use, I never touch it) Polygonal Lasso Tool: This is much easier to use, click to create a starter point. Click further on to make another point. Click further on to make another, and so on. Magnetic Lasso Tool: Works in the same way to the basic Lasso Tool, but snaps the selection to edges of images. Holding 'Shift' or 'Ctrl' have the same properties as above Magic Wand Tool (Quick Selection Tool by default in CS3) http://i186.photobucket.com/albums/x12/randomus_robbius/selectiontool.jpg You have two tools: The Magic Wand Tool again, makes selections. This selects areas of similar colour with just one click. The tolerance can be adjusted in the tool options. The Quick Selection Tool.... I really haven't worked out how to use it yet, I'm baffled :huh: Crop Tool http://i186.photobucket.com/albums/x12/randomus_robbius/croptool.jpg I'd be worried if you didn't know what this did, but anyway. This cuts out a defined part of your image and throws away the rest. Click and drag to select area of an image, fiddle around with the controls to get it perfect. Hit Enter(or return, whatever) or click the tick at the top in tool options. Voila. :lol: Slice Tool http://i186.photobucket.com/albums/x12/randomus_robbius/slicetool.jpg Never found a use for this, what does it do? :confused: Spot Healing Tool http://i186.photobucket.com/albums/x12/randomus_robbius/spothealingtool.jpg Four Tools: Spot Healing tool: This is used to remove blemishes, dirt, scratches etc from pictures. Click and drag over the blemish to remove. Healing Brush Tool: Same as the Spot Healing Tool, but you define a point to take detail from (Hold Alt and click) before going over the blemishes. Patch Tool: Use the freehand selection to go around the blemish. Click and drag the selection to an area with detail you want to replace the blemish with. Red Eye Tool: Removes Red Eye from photos. Click and Drag to make a selection over the eye. Brush Tool You'll use this quite a lot, it's used to put colour on images in various shapes and sizes. Brush Tool: You'll use this quite a lot, it's used to put colour on images in an infinate range of shapes and sizes. Click and drag to 'paint' on your image, hold 'Shift' to create only straight lines, 'Ctrl' changes to the move tool. Pencil Tool: This is similar to the brush tool, but doesn't have smooth edges. Often used at size one for pixel art. Same action as above Color Replacement Tool: Changes areas of a certain colour to the foreground colour. You can adjust the tolerance in Tool Options. Again, same actions as above. Photoshop come with lots of preset brushes, although they ain't that interesting. (How to download new brushes [link])Click on the drop-down menu and see what you've got (ignore the mahoosive (massive) bit on the right. http://i186.photobucket.com/albums/x12/randomus_robbius/th_brush.jpg The top slider adjusts the size of the brush. The box 'Use Sample Size' is for downloaded brushes, it puts them back to the default size. The bottom slider (not activated in my pic as I had a downloaded brush selected) adjusts how smooth the edges are. 0 means a real blurry edge, 100 is a very hard edge. The bit below these contains your brushes. Click on it to select that brush, and colour your image with that shape/style. Now to the mahoozive bit on the right. Click the small arrow in the top right of the drop-down box, and it'll appear. Probably won't be quite as big as mine :P Anyhoos, you probably won't need to worry about most of it except the big list at the bottom that starts 'Assorted Brushes'. This shows all the installed brushes in Photoshop. By default, these won't all be showing in the area where you select your brushes. But surely you want to have a play and see what they look like? So, click one of the bits in the list, start at the top if you're organized. :eek: Oh noez, the computer is shouting at you... http://i186.photobucket.com/albums/x12/randomus_robbius/ohnoez.jpg But it's fine, don't worry! Clicking OK removes the current list of brushes and replaces it with the one you selected. But I want to see them all at once! I hear you cry (well, I did anyhows). Click 'Append' and it'll add 'em on the the end of the ones you already had. Hoorah :) Clone Stamp Tool http://i186.photobucket.com/albums/x12/randomus_robbius/stamptool.jpg Clone Stamp Tool: This is used to replace areas of an image with another part of it (much like the Healing Brush). Hold 'Alt' to select a point to take detail/colour from. Go to the point where you want to cover summat up and click and drag. Voila. You can adjust the brush size for doing larger/smaller areas. Pattern Stamp Tool: This works in the same way as the brush tool, used to put pre-defined patterns on your image. The pattern is change in Tool Options. History Brush Tool http://i186.photobucket.com/albums/x12/randomus_robbius/historybrush.jpg History Brush Tool: This, again, works in the same way as the brush tool to put certain areas of your image back to how they were when you first opened it, or a pre-defined point (See #4) Art History Brush Tool: Um, can't say I've ever found a use for this. Nor do I have the foggiest what you could use it for :oook: Eraser Tool http://i186.photobucket.com/albums/x12/randomus_robbius/erasertool.jpg Eraser Tool: Click and drag to delete that area of the selected layer. Hold 'Shift' to erase only in straight lines. The brush size and shape can be adjusted in Tool Options. Erasing the background will put in the background colour unless you use the... Background Eraser Tool: This will erase the background and make it transparent (signified by white and grey background). Magic Eraser Tool: This keeps what you erase within the outlines (ie, large colour changes) of what you're erasing. To a certain degree, can't say it's that brilliant. Gradient Tool http://i186.photobucket.com/albums/x12/randomus_robbius/gradienttool.jpg Gradient Tool: Click and drag to insert a gradient in a selection, new layer, or an existing layer (will overwrite what was on that layer). By default, the gradient will be from your foreground to background colour, but you can change this in Tool Options. http://i186.photobucket.com/albums/x12/randomus_robbius/th_gradientoptions.jpg Clicking the long box (white to black in my pic) will bring up the Gradient Editor. You will see a few preset gradient, and the ability to make your own at the bottom. Next to that box are a range of different gradient styles - Linear, Radial, Angled, Reflected and Diamond. Have a fiddle with each, see what comes up :) Paint Bucket Tool: Click to fill with colour in a selection, new layer, or area of colour on a current layer. Hold 'Alt' to bring up with colour picker, and click to change the foreground colour to what your cursor is hovered over. Blur, Sharpen and Smudge Tools http://i186.photobucket.com/albums/x12/randomus_robbius/blurtool.jpg These do pretty much what it says on the tin. They work just like the brush tool - click and drag, the size and shape can be adjusted in Tool Options. Dodge Tool http://i186.photobucket.com/albums/x12/randomus_robbius/dodgetool.jpg Dodge Tool: Click and drag to lighten an area of an image. Burn Tool: Click and drag to darken an area of an image Sponge Tool: Click and drag to desaturate/saturate an area of an image. With each tool, the brush size and shape can be adjusted in Tool Options, and you also have the option of whether you desaturate (reduce colour) or saturate (increase colour) when using the Sponge Tool. Pen Tool http://i186.photobucket.com/albums/x12/randomus_robbius/pentool.jpg The Pen Tool creates paths. Paths are similar to selections, but don't have to be a closed area, and are much easier to create and modify until perfect. To create a simple path, select the following in Tool Options. http://i186.photobucket.com/albums/x12/randomus_robbius/path.jpg The other option to the left creates a filled area on a new layer. The option to the right creates a filled area on the current layer. Anyways, we want the one in the middle for now. To create a path, click. It's that simple. You now have your starting point. Click again, somewhere else, and you have another point with a straight line in between. To make a curved line, click somewhere on you're existing line. Now you have another point. Hold 'Ctrl', click and drag that point to create a curve. Simple, see? You will notice you also have two other smaller points sticking out each side of that point. These adjust the angle of the curve, and whereabouts along the line it curves. Hold 'Ctrl' and click to pull, twist and jiggle them around - see what happens. You can have any number of points on one line, click to create, 'Ctrl' + Click to move, click on it again to delete. When you've finished making your curve, click again further on from the end of your last point, and the line will go there. Then set about making the curve again.It may seem long winded at first, but you get used to it. Anyway, once you've created your path, you can stroke, fill, make selection or define custom shape. Right click to bring up the menu. Make Selection: This (surprisingly) turns your path into a selection. Usually best to use this on a closed path (ie, the ends meet) otherwise Photoshop will do it for you and you'll have some dodgy straight line that messes up your path. Fill Path: Also only works on closed paths, fills it with the foreground colour. Stroke: This creates a line on you image along the path. When you click 'Stroke Path' it asks which tool you'd like to use. So, you have to set up that tool beforehand so it looks right. For example, most people use the brush tool. So, select the brush tool and set it to 1 pixel. Set your foreground colour to black and select the pen tool again. Stroke path with the Brush Tool and make sure 'Simulate Pressure' is unticked. Ta-dah, one pixel stroke. Now you've done that, you can fiddle with different sizes and try turning on 'Simulate Pressure, this can create quite nice effects. As for the other tools in the drop-down menu, most of them we have use by pressing keyboard shortcuts, much easier than going there every time. The only one that might be of use is the Freehand Pen Tool, but as you know I hate freehand tools so we won't talk about that ;) Text Tool http://i186.photobucket.com/albums/x12/randomus_robbius/texttool.jpg You should really have worked out by now that this inserts text onto your image. You know, writing, words, letters, etc? Click to create the text layer, type with keyboard. Voila. Change font, size, etc in Tool Options or see #4. The Vertical Text Tool does the same thing... just vertically. Clever, see? Path Selction Tool http://i186.photobucket.com/albums/x12/randomus_robbius/pathselecttool.jpg Once again, also does what it says on the tin... As for the 'Direct Selection Tool', I haven't the foggiest. I didn't know it was there 'til I was taking screenshots and haven't quite worked out what it's for :p Rectangle Tool http://i186.photobucket.com/albums/x12/randomus_robbius/shapetool.jpg These tools create paths of preset shapes. Click and drag, hold 'Shift' to make a perfect shape. On some of the tools there are extra options. Rounded Rectangle Tool: Ability to change the size of the corner Polygon Tool: Ability to change the number of sides Line Tool: Ability to change the width of the line Custom Shape Tool: Ability to change shape. As with the brush tool, not all are loaded by default. Notes Tool http://i186.photobucket.com/albums/x12/randomus_robbius/notetool.jpg This inserts notes or audio comments in your file. Only works in PSD as far as I'm aware, usually used for communication in companies. ie, designer makes it, person who approves it looks at it, makes comments for them to change, and sends it back. I think. Anyways, its irrelevant :p Eyedropper Tool http://i186.photobucket.com/albums/x12/randomus_robbius/eyedroppertool.jpg The main tool here is the Eyedropper Tool, click this and you can select a colour from you image to become your foreground colour. Hold 'Shift' to use the Move Tool. Hand Tool http://i186.photobucket.com/albums/x12/randomus_robbius/handtool.jpg Used to navigate around your image when zoomed in. Click and drag to move around. Zoom Tool http://i186.photobucket.com/albums/x12/randomus_robbius/zoomtool.jpg Obvious, really. Change from Zoom In/Out in Tool Options, or just hold 'Alt' to change. #4: The Dock http://i186.photobucket.com/albums/x12/randomus_robbius/moreusefulstuff.jpg Unless you've got Photoshop CS3, this won't actually be there. All of the various bits and pieces will be part of the tabs at the right, or won't even be visible (for now). Either way, you can bring them up by clicking 'Window' in the Menu bar and finding them from the list. If they're already open in the tabs, it'll bring them to the front. In CS3, you can bring windows you've opened from this menu into the dock. History http://i186.photobucket.com/albums/x12/randomus_robbius/history.jpg This displays a list of the last few changes you've done. Remember that it doesn't keep everything you've done, after a while it overwrites the oldest changes. If you're going to do something you're not sure will work that will clog up the history (such as using the pen tool), right click and select 'New Snapshot' and it'll save the image in that state. To the right of every history item you will see a small empty box. Clicking this will define a point for the History Brush. Actions http://i186.photobucket.com/albums/x12/randomus_robbius/actions.jpg These are a saved sequence of changes made to an image. There are a few preset ones in Photoshop, but you can easily make your own. Simply press 'New Action' http://i186.photobucket.com/albums/x12/randomus_robbius/newaction.jpg and name it. Then hit the small 'Record' http://i186.photobucket.com/albums/x12/randomus_robbius/record.jpg button before you make the changes. Once you've made the changes, press 'Stop' http://i186.photobucket.com/albums/x12/randomus_robbius/stop.jpg. Now you've saved your action you can apply it to another images by simply pressing 'Play'http://i186.photobucket.com/albums/x12/randomus_robbius/actions.jpg. Tool Presets This is mainly for the Brush Tool and things like that. They are a set of saved tool settings - ie size shape, hardness, gradient - various things like that. There are again, a few preset ones in Photoshop but it's possible to save your own by clicking Edit in the menu bar and choosing 'Define Brush Preset'. Brushes http://i186.photobucket.com/albums/x12/randomus_robbius/brushes.jpg This is another are to chose your brushes and change the settings while giving a live preview of what it'll look like. Clone Source http://i186.photobucket.com/albums/x12/randomus_robbius/clonesource.jpg This is for use with the Clone Stamp Tool and gives you option to have more Source points and to show the overlay of where you are copying from Character http://i186.photobucket.com/albums/x12/randomus_robbius/character.jpg This gives lots of options for text, including height, kerning, tracking and the usual things such as font, size, bold, italic, etc. Paragraph http://i186.photobucket.com/albums/x12/randomus_robbius/paragraph.jpg This gives more text options for the text including line spacing and alignment. Layer Comps http://i186.photobucket.com/albums/x12/randomus_robbius/layercomp.jpg These are saved layer properties in an image. It means you can easily change between different designs of the same thing, as each layer comp saves properties such as position and visibility. You can create a new layer comp by clicking 'Create New Layer Comp' http://i186.photobucket.com/albums/x12/randomus_robbius/newaction.jpg. Then you can choose each one from the list. That's it! That's the end of this tutorial. This is just from my personal use of Photoshop. If anyone has summat they'd like to add, sned it to me and I'll put it in :) Now go press some shiny buttons ;)
-
I've had this game for a while but I have to have the graphics at the worst quality they go and my game still lags a bit. Does anyone have any ideas on how I could improve my gameplay? I have Windows XP, 1gb of ram, which is recommended on the box, Nvidia 6600 GT, which is also recommended. Please help
-
http://i186.photobucket.com/albums/x6/carmadmike/Mortimer.jpg http://i186.photobucket.com/albums/x6/carmadmike/MB.jpg http://i186.photobucket.com/albums/x6/carmadmike/250GTSWB-Tagged.jpg http://i186.photobucket.com/albums/x6/carmadmike/zondar-1.jpg http://i186.photobucket.com/albums/x6/carmadmike/Baldredsig2.jpg http://i186.photobucket.com/albums/x6/carmadmike/ZondaR.jpg http://i186.photobucket.com/albums/x6/carmadmike/Reventon-1.jpg http://i186.photobucket.com/albums/x6/carmadmike/rh12234-2.jpg http://i186.photobucket.com/albums/x6/carmadmike/fordmustang.jpg http://i186.photobucket.com/albums/x6/carmadmike/IronmanvHaloMan-1.png http://i186.photobucket.com/albums/x6/carmadmike/R8LMSig-1.png http://i186.photobucket.com/albums/x6/carmadmike/newunfinishedsig.png http://i186.photobucket.com/albums/x6/carmadmike/Myfirstsig.png http://i186.photobucket.com/albums/x6/carmadmike/S5sig1.jpg http://i186.photobucket.com/albums/x6/carmadmike/S5Sig2.jpg http://i186.photobucket.com/albums/x6/carmadmike/mustangsig.png http://i186.photobucket.com/albums/x6/carmadmike/GT2.png In a random order of when i made them, some of them i aint proud of, But i was using Gimp and didnt know how to use them Id like to think im getting better My latest: http://i186.photobucket.com/albums/x6/carmadmike/Sig.jpg And my first animated sig, just basic as it was also the first time i used the animation in Photoshop: http://i186.photobucket.com/albums/x6/carmadmike/Apprentice-sig.gif
-
Hey all, I don't need a new graphics card, but i want one. My problem is I have a limited amount of money, and i don't want to have to buy a new power supply (i have standard 305 watt). I currently have a Nvidia GTX 7600 GS. So here are my preferences: - Something that will run Crysis on high detail full res (i can currently run it on medium detail, just under full res) - Something that doesn't require an upgraded power supply - A card that is reliable Can anyone help me?