Consider supporting us by disabling your ad blocker / add to whitelist / purchasing VIP.


Adm-RAL
-
Posts
68 -
Joined
-
Last visited
-
Days Won
16
Content Type
Profiles
Forums
Blogs
Gallery
Downloads
Store
Lyrics
News
Guide
Calendar
Posts posted by Adm-RAL
-
-
@flipywap , most likely antiviruses swear at the "CAMERA_HACK.exe" program file!
Well, of course, as soon as these pseudo-antiviruses see a program that can intercept a signal from a game, they immediately call it a virus! Antiviruses don't have enough intelligence for more!
Don't worry, there are no viruses there! -
46 minutes ago, Aquarious said:
Sure, I'm up to test that. RUF Rturbo maybe?
Here, try ... I added Enzo there ...
In the test base, import these settings into the appropriate machines.Here, I shot another short video about the car's steering.
-
1 minute ago, Aquarious said:
Logitech G29 with H-Shifter.
Excellent. I just have Logitech Driving Force.
2 minutes ago, Aquarious said:I've always felt that TDU2 has an issue where cars loose their grip in the front quite quickly, leading to a lot of understeer when you don't expect it.
It does not depend on physics, but on the settings of the machine.
For the sake of interest, I can throw you my config of some of the standard machines from the game in order to understand what I'm talking about. Probably better to choose some fast car ... Which one?4 minutes ago, Aquarious said:I'm currently running the CTR Physics Mod.
I picked up a few ideas from this physics (or rather from the physics of Veno), but I have everything reconfigured in my own way.
And in general, in working with physics configs, testing the results is more important than understanding the parameters of an unpacked physics file. -
4 minutes ago, Aquarious said:
I will give the mod a shot myself!
What are you playing the game on? Steering wheel or keyboard?
-
I'm not sure I understood the question correctly.
If we are talking about the fact that in the original TDU2 cars turn too sharply, then I will answer like this:
- I tried my best to make keyboard physics as smooth as possible! However, this smoothness exists both when the rudder is turned and when the rudder is returned to zero. That's exactly what you have to get used to, as I wrote in the description of keyboard physics.
- with the steering (900 degrees steering wheel) physics, everything is now perfect in my opinion. The steering is very smooth and at the same time can be sharp if you turn the steering wheel abruptly. Unfortunately, I cannot film how I turn the steering wheel and how the car behaves at this moment. The player will have to install this physics, adjust the controllability in the game menu (as shown in the screenshots in the configurator), and then understand for himself whether the controllability is normal or not.
- I didn't do much physics with the steering (180 degrees steering wheel), because this is a very bad steering wheel. However, I tried to bring driving with such a steering wheel closer to driving with a steering wheel of 900 degrees. There, now, too, the car should not be thrown into a turn, when the steering wheel is turned 5 degrees.In addition, one must also take into account that I am not playing pure TDU2. In my mod, all the cars are reconfigured so that they go according to their parameters. Also, the suspension, aerodynamics, power parameters, handling, etc. have been reconfigured ... However, these are fine settings that only make each car unique, but do not globally affect handling.
I am afraid that I will not be able to convey all these feelings of riding on my physics in words. You have to try everything! If you have any suggestions, then I will try to help or explain how any parameters from the physics file or from the machine settings in the VPE work.
-
How to use the configurator and at the same time a little about my game retexture. And also FPS measurements on different configs.
Sometimes the video game freezes, because it is on my portable HDD USB3.0
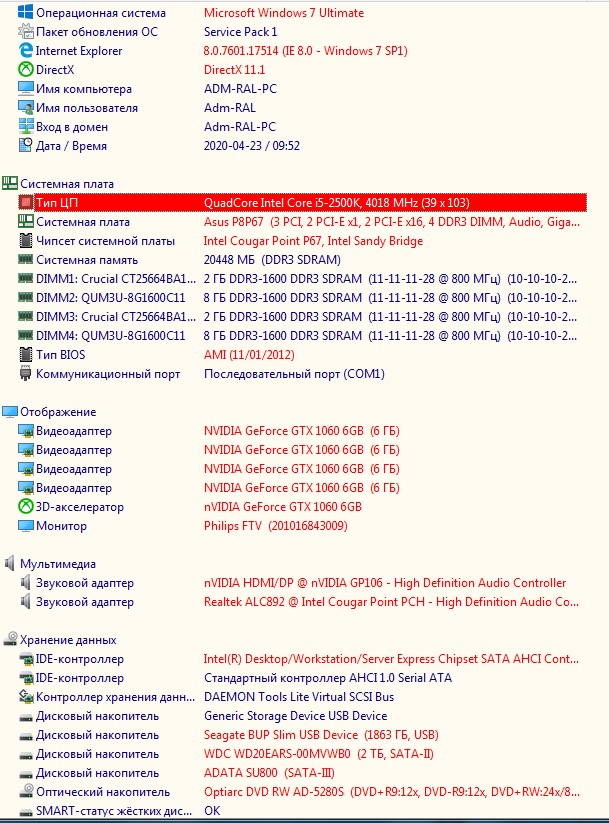
My computer -

-
9 minutes ago, Aquarious said:
Does it replace all textures in the game, so also buildings and props?
No. The mod replaces only the global textures of the islands, such as flora, roads, some material textures.
I doubt that I will have the patience to go through all the areas and replace all textures there with better ones. Moreover, right now I have a lot of work on my main modding game - Stalker.
However, I do not exclude that after the new year I will go through all areas and improve both terrain and all textures of materials. Everything will depend on employment in other projects. -
TDU2-RS Graphic Mod
Graphic part of the global modification TDU2-RS.
Content:
- Changed global textures of the islands of Ibiza and Hawaii.
- Replaced all flora of both islands.
- Replaced all road textures. Well, more precisely, not replaced, but improved.
- Reconfigured grass height.Installation:
- Requires unpacked version of TDU2!
- Unpack the archive.
- Put the Euro folder in the root folder of the game with the replacement of files.ATTENTION!!!
Mod VERY greatly increases the load on the computer! Competently calculate the strength of your technique!More screenshots here - https://drive.google.com/drive/folders/11WAX9G-YzbEQJEEtCAZoD3zQt3ruHknw?usp=sharing
The attached screenshots of the mod are made with the installed packages of maximum graphics and ReShade 4.3.0
Both TDU2 configurator and this mod are parts of one global game, so it is advisable to use them together to get the maximum result!
Link to TDU2 configurator page --
Submitter
-
Submitted11/27/2020
-
Category
-
-
I will show several videos about the work of the new control physics settings, which are presented in the configurator ...
This is how I rode keyboard physics (and at the same time a little sideways

Of course, keyboard physics will never allow you to feel the real sensations of driving, but now it is closer to reality. And yes, you have to get used to it for a while, but if you get used to it, you can start having fun!
As far as steering a 900-degree rudder is concerned, it is now just pure bliss, in my opinion. I'll show you later. And it seems to me (despite the opinions of many) that the game perfectly conveys the feeling of driving! I have quite a lot of experience in both auto and motorcycle driving and I can say that everything in the game is very similar to reality!Speaking of motorcycle bikes ... Here's a video about my new bike physics, after just half an hour of practice ...
(You can also see HD traffic from StarGT in the video. I hope this won't be a problem ...) The graphics are still old in the video. Tomorrow I'll upload my new TDU2 graphics mod to the site.
For comparison -
-
46 minutes ago, ZoM said:
So just wanting to know but does this configurator go into the original root directory or the unpacked TDU2 folder cause I have both.
Packaged or unpacked game - it doesn't matter! Game files that are changed / replaced by the configurator are always located in the root folder of the game. For the configurator to work, its folder must be located in the root folder of the game.
-
TDU2 Game Configurator
This configurator allows you to change and configure the game settings that are in the game files and are not available in the menu.
The configurator and the accompanying programs are suitable for the latest official build of the TDU2 game, as well as any amateur build on this version of the game.In addition to the ability to configure base game files, the configurator contains some additions to the game, such as:
- Camera Hack - allows you to adjust the position of the camera in the game online.
- SweetFX 2.0 - customizer for some aspects of the game graphics.
- ReShade 4.3.0 - a more powerful (and resource-intensive) customizer for some aspects of the game's graphics.
- 4Gb Patch - Allows the game to use more RAM.
- CPU Control - allows the game to run on all or only selected processor cores.Read more in the readme in the configurator archive!
Configurator installation:
1. Unpack the archive and put the "! TDU2-RS Game Configurator" folder in the root folder of the game.
2. Readme MANDATORY! All the configurator's features are described there. So far, readme is only in Russian. If there is anyone who wants to translate the readme into English, then I will only gladly accept your help!
3. Later, I will create a topic in which I will show everything in the video tutorials.Google translator
-
Submitter
-
Submitted11/26/2020
-
Category
-
-
3 hours ago, Alex500 said:
please anybody can download and add this vpe 3.5.1.8 to google disk
Не знаю почему у тебя не получается скачать, у меня всё легко качается.
Вот перезалил тебе, пользуйся - https://drive.google.com/file/d/1w_AYbNhbp8cjN5XNWKg2LsTRW5pB5qRy/view?usp=sharing
-
12 hours ago, Aquarious said:
The easiest way would probably be a save editor.
Well, that's not the best option. So you can simply recalculate the cost of a car in VPE, sell it and buy a new one with a new interior color. And then return the normal value to the car.
It would be nice to change the interior color in the game. How the wheel rims were changed in the workshop. But, here again a question to the game engine.By the way, the question of the limited number of slots in the game's database, about a year ago, I decided a banal instant substitution of the game's database. I needed this so that it would be possible to add cars to the game indefinitely, but I think it is clear that this approach allows solving other problems of the limitations of the game database.

Now I don't think about restrictions at all!
This is how it works:This is just advice. I hope no one will be offended.
-
Google Translate:
The database contains a huge number of free wheel rim slots for use on added vehicles. Even in my mod, where all slots for cars are used (250 fully functioning cars in the game), about 30-50 free slots for rims remain free. Just take the desired wheel model, rename it to a new one and connect using an empty wheel slot. No problems.
I will add:
In the game, the position of the wheels of the car is tied to its model. Even if it turns out (and this is in principle possible) to give several cars the same wheel slot, then on different models they very often occupy different positions relative to the ground. One model will have the wheels hanging above the ground, the other will sink into the ground, and the third will stay on the ground correctly. And often on different models the wheel rim in the tire will be located differently. Somewhere it will fit into the tire normally, and somewhere it can hang freely inside the tire or sink inside it. At the same time, the settings for one ID are only one, and it simply will not work to correctly configure the wheel for several cars at once. 49 minutes ago, Aquarious said:We're also looking into more stuff like being able to change the interior color of a car after initial purchase.
It would be good, but I think that you probably can't do without editing the game engine. Are there open sources of the game engine? It would be possible to add such a feature to the workshop, but I doubt that without the source of the engine, this can be done.
-
Вот, пробуй - https://drive.google.com/file/d/1ELjldB3E7fupd8NSVw9R6jnGQtEQbeLk/view?usp=sharing
Я поправил только текстуры, которые могут давать черноту. У тебя была вообще не исправлена текстура sol_01.dds. Она имела ВСЕ ММ.
Для текстур 1024, я принял решение делать только 5 ММ. Для текстур 2048 только 6. И т.д.
Вот, как я делал -
И лучше это всё переделать заново из исходников! Потому-что при каждом сохранении в формат с сжатием, качество текстуры ухудшается немного!
Google Translate:
Here, try it - https://drive.google.com/file/d/1ELjldB3E7fupd8NSVw9R6jnGQtEQbeLk/view?usp=sharing
I only corrected textures that can give blackness. Your sol_01.dds texture was not fixed at all. She had EVERYTHING MM.
For 1024 textures, I decided to do only 5MM. For textures 2048 only 6. And so on.
This is how I did -
And it's better to redo it all from the source! Because every time you save to a compressed format, the texture quality deteriorates slightly!
- MagicV8, Aquarious and Ramon1991cobra
-
 3
3
-
Текстуры земли, песка, травы (террейн) на самом деле не текстуры в обычном понимании. Это детейл! Он не имеет цветности и цветных каналов. Цветность таких текстур задаётся маской конкретного сектора карты. Ты должен был видеть эту маску, когда редактировал текстуры карты и реальные пейзажи островов. Кроме того, там вторая маска (обычно розовая такая) отвечает за распределение детейлов террейна на поверхности земли (каждый из каналов задаёт свой детейл на земле).
В каналах текстур детейла храниться чёрно-белый рисунок силуэта объектов на текстуре, спекуляр и ещё что-то (с чем я пока не разобрался, да и не интересно это, потому-что всё работает и так нормально ). + к этой текстуре прилагается нормаль (в своём обычном виде). Обе эти текстуры хранятся в формате DXT1, т.к. не нуждаются в альфа-канале.
Сохраняются они ровно также, как я показал в уроке. Пытайся ещё. Если не выходит, значит ты что-то неправильно делаешь. Я у себя всё сохраняю без проблем и всё получается правильно. На крайний случай, скинь мне текстуру, которую нужно поправить, я тебе её сделаю и посмотрим.
Есть в той же папке и другие детейлы, имя которых начинается на д3_ - эти текстуры тоже детейлы, но вся информация для их работы хранится в одном файле и должна сохраняться в формате DXT5, потому-что в них используется альфа-канал, в котором хранится чёрно-белый рисунок силуэтов объектов на текстуре. В канале Р - хранятся тени (лево - право); в канале Г - хранятся тени (верх - низ); в канале Б - хранится спекуляр. Канал Б нормали таким образом утерян, но он не так важен и им разработчики пожертвовали, чтобы сыкономить на кол-ве и весе файлов и не делать два файла (как в первом случае). В случае сохранения таких файлов (DXT5) не удаляй альфа-канал, когда будешь сохранять файл уже для конвертации для игры (последний этап)!
Кстати, этот метод работает также, если сохранять меньшее кол-во ММ уровней! Например, если хочешь чтобы текстуры вдалеке выглядели чётче, то можно оставить только 4-6 ММ уровней. Если хотим сделать 4 ММ уровня, сначала создаём 5 ММ уровней при первом сохранении текстуры в DXT8888, а потом открываем её с ММ уровнями и пересохраняем с сохранением только 4 ММ уровней.
По идее, это должно правильно работать и с текстурами веток и всей флоры. Т.е. можно сделать так, чтобы листва вдалеке не размазывалась в пятно, а немного рябила, что придаст живости картинке! Я у себя вообще текстуры веток сохранял без ММ уровней, что на полном графическом ускорении и сглаживании видеокартой, даёт просто абсолютно реалистичную картинку.
В каждом конкретном случае при создании текстуры, нужно учитывать фактор влияния ММ уровней на картинку, тогда можно добиваться потрясающих результатов!Google translate translation:
The textures of earth, sand, grass (terrain) are not actually textures in the usual sense. This is a detail! It has no chroma and color channels. The color of such textures is set by the mask of a specific map sector. You should have seen this mask when editing map textures and real island landscapes. In addition, there the second mask (usually a pink one) is responsible for the distribution of terrain detail on the ground (each channel sets its own detail on the ground).
The texture channels of the detail store a black and white drawing of the silhouette of objects on the texture, a specular and something else (which I have not figured out yet, and it’s not interesting, because everything works fine :)). + a normal is attached to this texture (in its usual form). Both of these textures are stored in DXT1 format, since don't need an alpha channel.
They are saved in exactly the same way as I showed in the lesson. Try again. If it doesn't work out, then you are doing something wrong. I keep everything with me without problems and everything turns out right. As a last resort, throw me a texture that needs to be corrected, I'll make it for you and see.
There are other children in the same folder, the name of which begins with d3_ - these textures are also detailed, but all information for their work is stored in one file and must be saved in DXT5 format, because they use an alpha channel, which stores the black and white drawing of silhouettes of objects on the texture. Channel R - shadows are stored (left - right); channel G - shadows are stored (top - bottom); in channel B - specular is stored. Channel B of the normal is thus lost, but it is not so important that the developers sacrificed it in order to save on the number and weight of files and not to make two files (as in the first case). If you save such files (DXT5), do not delete the alpha channel when you save the file for conversion for the game (the last stage)!
By the way, this method works also if you keep fewer MM levels! For example, if you want the textures in the distance to look sharper, then you can leave only 4-6 MM levels. If we want to make 4 MM levels, first we create 5 MM levels when we first save the texture to DXT8888, and then open it with MM levels and re-save with only 4 MM levels saved.
In theory, this should work correctly with the textures of branches and all flora. Those. you can make sure that the foliage in the distance does not smear into a stain, but ruffles a little, which will give liveliness to the picture! In general, I saved the textures of the branches without MM levels, which, at full graphics acceleration and antialiasing by a video card, simply gives an absolutely realistic picture.
In each case, when creating a texture, you need to take into account the influence of MM levels on the picture, then you can achieve amazing results! -
Попробую сделать ещё одно доброе дело...
Посчитав для себя исправление проблемы чёрных текстур террейна вдалеке принципиальным (текстурщик я или кто? ), я решил эту проблему. Теперь могу поделиться знанием с автором этой графической модификации!
Правильное сохранение текстур TDU2:
1. Создаём бэкап исходника.
2. Открываем исходник в Фотошопе при помощи плагина для работы с DDS от NVIDIA.
3. Вносим необходимые изменения в текстуру.
4. Сохраняем текстуру в формате без потерь DXT 8:8:8:8 с созданием "9" MipMap (ММ) уровней текстуры.
5. Закрываем текстуру.
6. Открываем эту текстуру с открытием всех созданных ранее ММ уровней.
7. Сохраняем текстуру в нужном рендеру формате DXT с сохранением созданных ранее ММ уровней, но оставляем только "8" ММ уровней.
8. Конвертируем текстуру, запаковываем и отправляем текстуру в игру.
В случае такого метода сохранения текстуры, мы больше не будем видеть черноту вдалеке! В принципе, так следует сохранять все текстуры в игре, но особенно это важно для текстур террейна, так-как они очень быстро переключают ММ уровни, потому-что они очень часто под очень маленькими углами вида камеры).
Спасибо разработчикам игры за настолько кривой рендер, который не умеет правильно работать со всеми возможностями текстурирования! Хотя есть игры, которые созданы сильно раньше TDU2 и которые уже тогда могли использовать все возможности текстур...
Рекомендую автору данной графической модификации исправить данную проблему с почернением текстур. Это всем пойдёт на пользу!Ну, в общем, сейчас покажу это всё в видео-уроке. Причём, покажу и что будет, если сохранять текстуры обычным способом с созданием всех ММ уровней.
Разумеется, изменения в текстуре были лишь для того, чтобы провести тест и всё показать. Теперь она летит в помойку...
Я, в своей глобальной модификации уже исправил все текстуры таким образом. И могу выложить тут графическую часть своей игры, если администраторы не будут вставлять мне палки в колёса. Или будете?

Также могу поделиться созданным на днях геймплейно-графическим конфигуратором для игры. В конфигуратор входят: несколько вариантов разработанной мной физики для разных контроллеров (руль, клавиатура), камхак, настройки геймплея, настройки параметров качества графики, SweetFX, ReShade.Спасибо за внимание!
Google translate translation:
SpoilerI'll try to do one more good deed ...
Considering for myself fixing the problem of black textures of the terrain in the distance is fundamental (me or someone else? :)), I solved this problem. Now I can share my knowledge with the author of this graphic modification!Correct saving of TDU2 textures:
1. Create a backup of the source.
2. Open the source in Photoshop using the NVIDIA DDS plugin.
3. Make the necessary changes to the texture.
4. Save the texture as lossless DXT 8: 8: 8: 8 with "9" MipMap (MM) texture levels.
5. Close the texture.
6. Open this texture and open all the previously created MM levels.
7. Save the texture in the DXT format you need to render, keeping the previously created MM levels, but leave only "8" MM levels.
8. Convert the texture, pack and send the texture to the game.
In the case of this method of preserving the texture, we will no longer see blackness in the distance! In principle, this is how all textures in the game should be preserved, but this is especially important for terrain textures, since they switch MM levels very quickly, because they are very often at very small camera angles).
Thanks to the developers of the game for such a crooked render that does not know how to work correctly with all the texturing possibilities! Although there are games that were created much earlier than TDU2 and which already then could use all the possibilities of textures ...
I recommend that the author of this graphic modification fix this problem with texture blackening. It will benefit everyone!Well, in general, now I will show all this in a video tutorial. Moreover, I will show you and what will happen if you save the textures in the usual way with the creation of all MM levels.
Of course, the changes in the texture were just to test and show everything. Now she flies into the trash ...
I, in my global modification, have already fixed all the textures in this way. And I can post the graphic part of my game here, if the administrators will not put sticks in my wheels. Or will you? )))
I can also share the recently created gameplay-graphic configurator for the game. The configurator includes: several variants of physics developed by me for different controllers (steering wheel, keyboard), Camera Hack, gameplay settings, graphics quality settings, SweetFX, ReShade.Thanks for attention!
- Ramon1991cobra and Aquarious
-
1
-
 1
1
-
-
2 hours ago, Eudemon said:
if someone has the file
I gave a link to the files "GMC Syclone 1992".
You can reload them to this site ...
https://drive.google.com/drive/folders/1n5pAEwBBvuV1LRZoSzoYfStQgrk7h1Vq?usp=sharing -
30 minutes ago, BrianCustoms said:
chrysler 300c
Not. I have the only option (from AutoPack 1.73) and it suits me perfectly. I have no others.
Spoiler -
I had to assemble the car piece by piece. Devices may not work properly.
https://drive.google.com/drive/folders/1n5pAEwBBvuV1LRZoSzoYfStQgrk7h1Vq?usp=sharing
Spoiler -
On 7/15/2020 at 11:29 PM, Guest Ragna said:
i cant download the car ...can someone give another link of it please ?
https://drive.google.com/drive/folders/1UbCtTbbrY-Y3dGTwUizn6Jz8HnDqjN0e?usp=sharing
Spoiler -
On 7/16/2020 at 11:18 PM, BrianCustoms said:
Can it be reuploaded ?
https://drive.google.com/drive/folders/1BqgOJ6kJX_YjRYrh7kQCgc71Z4ZhETaq?usp=sharing
Had to revive the old dead HDD...
-
2 часа назад TDUZoqqer сказал:
speak english
Yes, my general!

Great model! Thank you Anatoly!

I fixed some textures to make the model look more like the original.
Tried to get close to this - https://www.a777aa77.ru/2020-bmw-m8-competition-coupe-f92.php
By the way, a good site with sports car configs!
Here's what happened:
VIDEOS
If anyone needs it, here are the corrected files - https://drive.google.com/open?id=1jsHQugTa8VNuMw7IYS3DdLPoMC5e321D
The car hit the global RS. Even had to remove a lower quality model ...
Lesson on how to use a translator:Spoiler


TDU2 Game Configurator
in Tools / Others Mod
Posted · Edited by Adm-RAL
How are the experiments going?
I also just bought it myself in my game ...
And I rode a little ...
I took the machine config from here - https://www.supercars.net/blog/2001-ruf-911-rturbo/
Correctly. So it should be with them!
The best virus protection is a smart gasket between the monitor and the chair!
As well as the most important part in a car - the gasket between the steering wheel and the seat! Although, this is not so often the case ...